Automotive Kits
ECU Data Copying - Digital Cluster Calibration - Airbag Resetting - Immobilizer Reflashing - Body Controller Cloning
automotive networkHISTORY - Beginning in the late 1980s, vehicle manufacturers, faced with increasing emission requirements from the government, began to use small, microprocessor based computers to manage engine operation. The reason for this was that the previous mechanical emission control systems could not meet the newly imposed government standards. Computer management of the engine was extremely successful as it allowed precise control over all parameters of operation. Not only could manufacturers now meet emission standards, but also improve fuel economy and performance. Once manufacturers realized the flexibility of computer control, computer based modules began appearing in an increasing variety of applications: transmission controllers, anti-lock brakes, digital clusters, vehicle security, SRS systems and more. As time progressed, automotive engineers realized that it would be advantageous for the modules to communicate information with each other. This would allow the ECU to pass information to the transmission controller and vise versa. If the security system sensed a break-in it could communicate to the ECU to prevent the vehicle from starting. Today all modern cars have a network (usually CANBUS) over which all modules are linked.
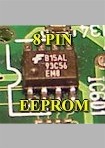
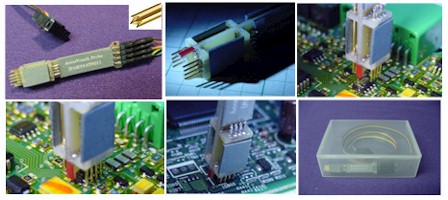
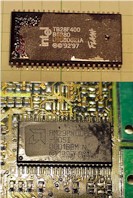
THE PROBLEM - With modules controlling nearly every aspect of vehicle operation, a module failure may cause a replacement issue for the automotive technician. This is because in order for the replacement module to communicate with the other modules on the network, it must contain information which is specific to the car. Usually this is the VIN, but not always. If a new module is purchased it must be programmed, using special software via a dealer tool or computer connected to the cars diagnostic port. This procedure is called "marrying" the module to the car. In otherwords, the replacement module must be programmed so that it will be accepted by the other modules in the vehicle. If this is not done, the module will not work. This is why, if there is a module failure, many times you cannot replace the defective module with one of the same type that is used but good. The reason is that the data stored in the used module does not match the data stored in the original. The solution is to move the data from the memory of the original module directly to the memory in the used module. This, in essence, creates a clone of the original module. Once this is done you simply install the cloned module into the car. No marrying is required. The Automotive Kits allow you to perform this function plus more. With an Automotive Kit you work directly with the memory part in the module which contains the vehicle data. This means that you are not limited in what you can do. You can perform a simple module clone or a VIN edit. You may also perform crash data clearing, cluster calibration or immobilizer reflashing. The kits are complete and provide everything you need including the programming package with an excellent step-by-step, hands-on tutorial where you work with an actual programmed memory part.
HOW THE AUTOMOTIVE KITS WORK
The Automotive Kit works by bypassing the vehicle network (OBD or diagnostic port). With the kit you work directly with the memory part which is located in the module itself. There are no software updates to purchase or subscriptions to maintain. It does not matter if the vehicle part is an ECU, airbag module, digital cluster or one of the many body controllers. Nor does the vehicle manufacturer matter. The same electronic memory technology, called EEPROM, has become the standard storage mechanism used in vehicle modules to retain data. What is EEPROM? EEPROM stands for "E"lectrically "E"rasable "P"rogrammable "R"ead "O"nly "M"emory. This is a memory technology which has a unique characteristic; it does not loose its data when power is removed; it does not forget. This feature makes EEPROM the technology of choice for storing vehicle data such as mileage, airbag crash data, immobilizer key sequences, learned ECU parameters, transmission shift points plus more. If the EEPROM memory is a single, self-contained part, it is usually fabricated in a small 8 pin package. Some modules will have the EEPROM fabricated on the same chip as the module computer (called a microcontroller). The microcontroller, since it's the module computer, will be fabricated in a square package with pins on all four sides. The EEPROM will always be in one of these two parts, an 8 pin chip or a multi-pin microcontroller.
automotive and vehicle eeprom and microcontroller
The first step is to open the module and locate the EEPROM part. We provide a document (HOW TO LOCATE AND IDENTIFY SERIAL EEPROMS AND MICROCONTROLLERS FOUND IN VEHICLE MODULES AND CIRCUIT ASSEMBLIES) to assist you. The top photos show an airbag module and a vehicle immobilizer. The part number is printed on the top of the chip. This example uses 8 pin parts as they are the most common (used in about 85% of modules). There are three different families of 8 pin EEPROMs, the 93 series, the 24 series, and the 25/95 series. The series of part found in a module was determined by the engineer who designed it. This means that a Ford airbag may use a 95320 while a Toyota airbag may use a 93C56. The photos on the right show a 93C56, 95320 and 93C66. After you start the programming system you enter the part number. The system will then configure itself to communicate with the part and show you how to attach to the part itself.
airbag eeprom and immobilizer eeprom
Once the chip is selected you connect the programming system to the part. The kit includes two options; the chip clip or probe set. A quick connect option (not included) is the AccuTouch Probe. All connection options, including the clip and probe set, use a standard plug to attach to the programming unit. The chip clip is used most often due to the convenience. The clip is aligned using a red dot to indicate chip pin#1. The chip will have a dimple or slanted side to indicate pin#1. It's simple; align the dot with the dimple or slanted side, squeeze the clip to open the jaws, place it over the chip and release. The probe set is normally used to connect to a microcontroller but can also be used to attach to an 8 pin part. The probe set is color coded (EIA standard) brown (#1) through gray (#8) as is the connecting cable. When you connect to a microcontroller the kit includes diagrams to show you which probe color to connect to the microcontroller package pin.
automotive and vehicle clips and probes
With the programming system connected to the chip, you are now ready to work. What can you do with an automotive kit? Here are some of your choices:
MOVE DATA FROM ONE MODULE OR ECU TO ANOTHER
EDIT/CHANGE A VIN NUMBER
CALIBRATE OR CLONE A DIGITAL CLUSTER
Let's use an ECU as an example. Assume that you have a defective ECU. Some component has failed, perhaps an injector driver but the EEPROM memory is OK. You get another ECU of the same type, perhaps from a wrecked or salvage vehicle. Now you want to put the data from the original ECU into the salvage vehicle unit. First attach to the EEPROM in the original ECU and read the data into the programming system. Now disconnect the original ECU and attach to the salvage unit. Instruct the programming system to program the data into the salvage ECU. That's it. It's a simple copy operation. It will work with any module, not just ECUs. You can use it on a damaged digital cluster. Both the mileage and the VIN will move to a replacement. Airbags are different but the kit handles those too.
programming ECUs, airbag modules, digital clusters and engine immoblilzers
THE AUTOMOTIVE EEPROM TRAINING TUTORIAL
So how do you know what to do? Provided with the Automotive Kit is a comprehensive, step-by-step, hands-on tutorial which includes a real 8 pin EEPROM (93C56) which has been preprogrammed with automotive data. The tutorial is composed of two parts. The first part teaches you to use the programming system. By following a series of exercises, you start the system, select the 93C56 part, attach to the tutorial chip and read the data which you see appear on the screen. You then work, using system commands, on the data which you have read from the chip. You will learn to edit data, different ways to program the data back into the chip, how to save the data to a file for later use plus more. Part 1 of the tutorial also includes a section which teaches you about how the data in the EEPROM is formatted plus what the data means. The goal of the tutorial is to make you an EEPROM expert. We want to strip away the mystery so you can work confidently with these parts no matter where you find them. Part 2 of the tutorial are automotive specific exercises. Each exercise covers a relevant topic including digital custer calibration, ECU data copying, clearing airbag crash data, VIN number modification and immobilizer reflashing. We walk you through each step so you know exactly how to do it. The tutorial EEPROM is used to simulate an airbag module, ECU and vehicle immobilizer. You will learn by doing. (customer comment)
autmotive eeprom training tutorial vehicle 93C56 eeprom
automotive eeprom training tutorial
HOW THE KIT HANDLES AIRBAG MODULES - The automotive kits use a technique called "TEMPLATES" to clear crash data. When a collision occurs, sensors in the vehicle recognize the event and deploy the airbag(s). At the same instant, the microcontroller in the airbag module records vehicle sensor information (speed, brake pedal position, throttle position, etc.) and writes it into the module EEPROM. This is the crash data. There are specific areas in the EEPROM memory array where the crash data is stored. (STEP1 image) Before the collision these areas were empty. After the crash they are filled. To clear crash data the areas which store the crash data must be restored to an empty or pre-collision state. This is normally hex codes 00 or FF. The vehicle kit software, using the TEMPLATE technique, will first read the data from the module EEPROM into the system. (STEP 1 image) The correct airbag module template is then selected. (STEP 2 image) The selection is based on the vehicle make, model and airbag module model number. The vehicle year is not required. This is because the same airbag system may be used over several model years. Once the correct template is selected, the template is executed by pressing a function key. (STEP 2 image) The TEMPLATE overlays the crash data in the system and only clears the areas where the crash data is located. This clears the crash data which was read into the system. (STEP 3 image) With the data cleared you then program the cleared data back into the module EEPROM. The system will confirm correct programming. The module is now restored to its default condition and is ready to be reinstalled into the car.
A comprehensive set of vehicle templates is included with the kits including ACURA, ALFA, AUDI, BMW, CHEVY, CHRYSLER, CITROEN, DACIA, DAEWOO, DAIHATSU, DODGE, FORD, FERRARI, FIAT, HYUNDAI, HONDA, INFINITI, IVECO, IZUZU, JAGUAR, KIA, LADA, LANCIA, LAND-ROVER, LEXUS, MAZDA, MITSUBIBHI, MERCEDES, MINI, NISSAN, OPEL, PORSCHE, PEUGEOT, RENAULT, ROVER, SAAB, SATURN, SCION, SEAT, SANGYONG, SKODA, SUBARU, SUZUKI, TOYOTA, VAUXHALL, VOLVO and VW. The kit also includes instructions which allow you to create your own templates. The latest templates may be downloaded (free) from our website. (airbag templates)
airbag module  vehicle screen airbag module  vehicle screen airbag module crash data screen
AUTOMOTIVE KIT#1 - Part#KBC-1 - $479.00
AUTOMOTIVE KIT#1 provides everything you need to work with 8 pin EEPROMs found in automotive ECUs plus any other vehicle module. We suggest Kit#1 if you are new to this field of automotive work and wish to learn. The kit includes the programming unit (#AR-32A) with software, the In-Circuit EEPROM adapter (#ASERSM1A), the surface mount chip clip (#ASOIC8), the surface mount probe set (#SMP8), the hands-on tutorial plus airbag crash data removal templates and instructions. NOTE: If your needs change, all kits can be upgraded in the future with the addition of an adapter or option.
automotive eeprom
automotive airbag repair kit items
AUTOMOTIVE KIT#2 - Part#KBC-2 - $619.00
AUTOMOTIVE KIT#2 provides everything you need to work with both 8 pin EEPROMs and Motorola microcontrollers found in automotive ECUs and any other vehicle module. The kit includes the programming unit (#AR-32A) with software, the In-Circuit EEPROM adapter (#ASERSM1A), the microcontroller adapter (#ACOM2), the surface mount chip clip (#ASOIC8), the surface mount probe set (#SMP8) and the hands-on tutorial plus airbag crash data removal templates and instructions. Also included is the terminator board which is used to interface the probe set to the ACOM2.
automotive eeprom and microcontroller
vehicle repair kit for eeproms and microcontrollers
AUTOMOTIVE KIT OPTIONS
PRECISION PROBE SET
Part#PPS8 - $249.00
The PRECISION PROBE SET allows connection to EEPROM and microcontroller packages which are too small for attachment using the SMP8 probe set. The PPS8 is the only connection option for these ultra small , fine lead pitch packages. The PPS8 plug attaches to both the ASERSM1A and ACOM2 adapters. (additional information)
automotive surface mount probe set
DIP CLIP - Part#ADIP8 - $69.00
The DIP CLIP allows connection to EEPROMs which are fabricated in a DUAL IN-LINE (DIP) package. DIP packaged parts are larger than surface mount devices and have pins which are inserted into holes in the circuit board. (also called "through hole") DIP packaged parts appeared before surface mount. They are found in some modules but are not common. (additional information)
automotive dip clip
AUTOMOTIVE POWER CABLE
Part#CBL12DC - $39.00
The CBL12DC allows the AR-32A programming unit to be powered from a standard 12 VOLT DC vehicle accessory connector. The cable includes a fused plug assembly with replacable fuse which is inserted into the vehicle for power. The opposite cable end is terminated with the standard AR-32A compatible plug.
vehicle accessory power connector for AR-32A
AccuTouch Probe - Part#ATPB1 - $139.00
The AccuTouch probe provides a quick-connect option for 8 pin (SOIC) surface mount serial eeproms. Unlike a clip, the probe is held in place while reading or programming a part. Each probe pin tip incorporates a 4 point crown design which offers good sealant penetration plus a wide connection footprint. An alignment notch allows accurate positioning of the probe over the chip package. Once in place, you press straight down until the notch ends touch the circuit board with the pins contacting the leads. A red mark on the end of the notch marks pin #1.
surface mount chip clip
TRAVEL CASE - Part #CASE32A- $69.00
The Andromeda Research Organization and Travel Case allows you to keep your programming unit, adapters, clips and probes plus more in one organized package. The case is fabricated using sturdy, high quality, industrial grade material including a rugged carry strap. When closed, the cover latches in place using quick release parachute clips. Inside, the case is divided into three pockets; one large specifically for the programming unit, a second with sufficient space for adapters, clips and probes plus a third for smaller items.
Travel case
44 PIN SOIC (8/16 bit) FLASH EPROM ADAPTER
Part #ASOIC44/M8
- $229.00
This adapter supports 44 PIN SOIC flash eproms. These parts include both the 28F and 29F families of 8/16 bit devices. These parts are found in a variety of applications including automobile ECUs (photos). The adapter supports device sizes ranging from 1 to 16 MEG including low voltage (LV) components from any manufacturer. The adapter incorporates a high quality, positive lock clam-shell socket.
44 pin vehicle flash eprom 28F400automotive adapter for 28F400 and 29F400
AUTOMOTIVE KIT TO LOCKSMITH KIT UPGRADE
Part #KBCKLS/UPG - $60.00
The Automotive Kit to Locksmith Kit upgrade package allows owners of Automotive Kit#1 or Kit#2 to upgrade their Automotive Kit (KBC) to a corresponding Locksmith Kit (KLS). The upgrade package includes RED and BLACK Honda keys for Honda and Acura vehicles plus the RESYNC BLOCK (resynchronization) for Toyota and Lexus vehicles. The Honda/Acura keys align with the file used to reflash the immobilizer and are cloned to give to the customer. The RESYNC BLOCK is placed on the vehicle diagnostic port to synchronize a reflashed immobilizer to the ECU. Both the keys and block come in a hard carry case with instructions.
automotive kit to locksmith kit upgrade
READY-TO-GO CF-29 PANASONIC TOUDHBOOK
Many customers have requested that Andromeda Research offer complete turn-key packages which not only includes the automotive kit, but also a suitable host machine. To address these requests, Andromeda Research offers a full size notebook (Model CF-29). Each machine is fully tested and reconditioned. The operating system installed on these machines is Windows 7 Ultimate which is integrated with the original factory drivers to insure functionality with specific machine peripherals. Both the original USER and REFERENCE manuals are provided in PDF format plus a PDF reader is preinstalled. This allows you to become familiar with the full capabilities of the machine. We also install the latest edition of our software so the machine is ready-to-go out of the box. A charger is included and the battery will hold a charge. Each machine is covered by a 90 day repair/replacement warranty (battery excluded).
(additional information)
Toughbook